Snow Algae Citizen Science Volunteer Protocol
2022 UPDATE: This project is no longer actively recruiting volunteers. If you are still interested in volunteering, please see https://wp.wwu.edu/livingsnowproject/.
The Snow Algae Atlas aims to map the distribution of snow algae by classifying satellite imagery. Volunteers help by hiking to predicted snow algae points to see whether our satellite-predictions are correct. Volunteers get a free 1-year Gaia GPS Premium membership! Here is the protocol:
- Sign up
- Download points
- Import points to Gaia
- Collect field data
- Submit data
- Optional: microscopy!
- Optional: collect for sequencing
0. Sign up
To sign up, please fill out the liability waiver, using your gmail as your email address. You only need do this once. Once we have processed your form we will activate your Gaia GPS Premium account and EpiCollect5 account. Note: you will need a gmail account—this is required to login to the data collection app (EpiCollect5).
1. Download points
A few days before your trip, visit the Point Finder. Do this within a day or three before you leave, so you get the most recent satellite imagery.
1A. Generate points. Use the map or searchbox to center the map around the area you plan to visit, and click the ‘Get Points’ button on the right panel.
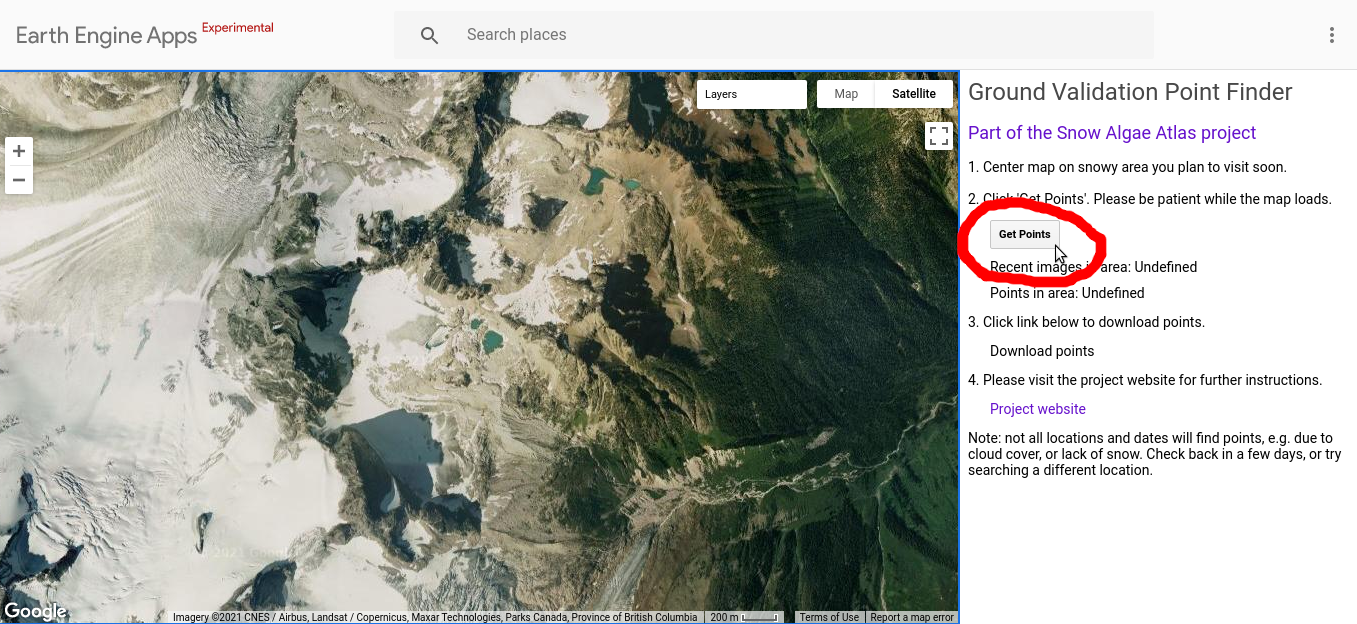
This searches your region for recent, cloud-free satellite imagery. If any is found, it searches that image for red snow, and applies machine learning to predict whether the red snow is snow algae or something else (e.g. mineral dust on snow surface). Red points are predicted snow algae, blue points are predicted “something else”.
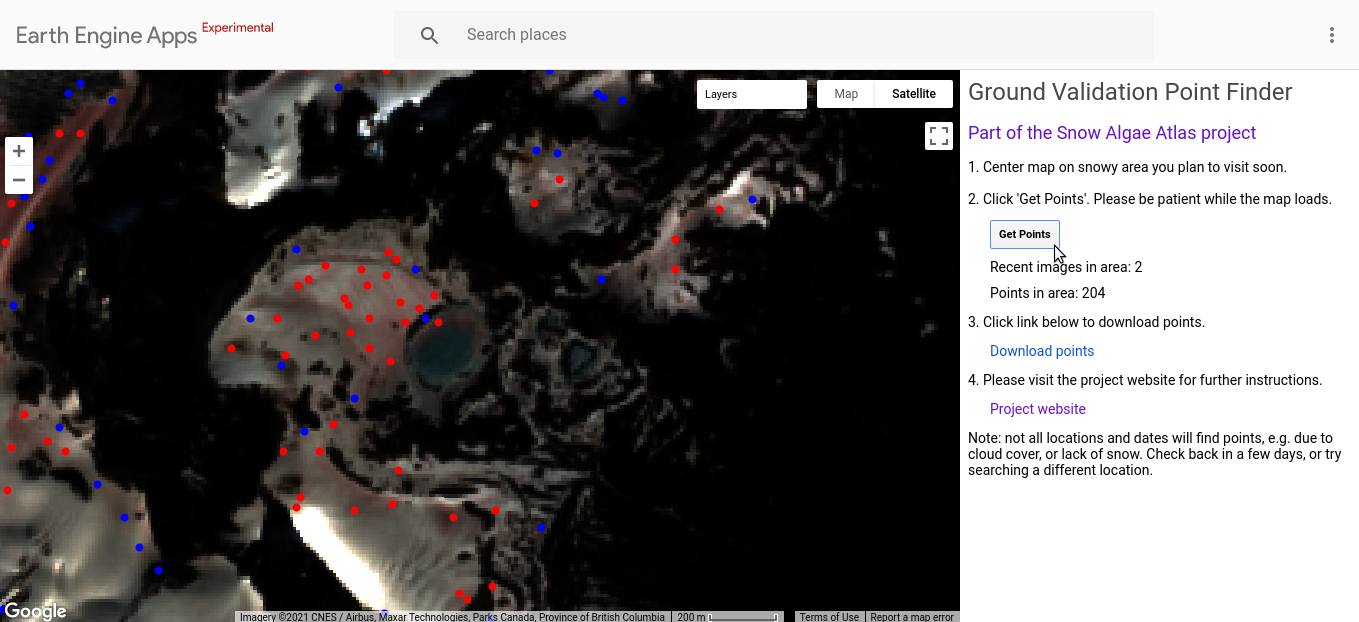
This may generate as many as several hundred points—we don’t expect you to visit them all! Visit as many as safely and reasonably possible. Even just one point provides us with valuable data. Between 10 and 20 is reasonable for a day trip. Ideally, we would like you to visit an equal number of red and blue points, but this may not always be possible or practical. We expect the algorithm to find more blue points than red points, so if in doubt visit more red points!
If no images or points appear, it may be because there the recent imagery is too cloudy, or the algorithm isn’t picking up any red snow in that particular region. The satellite (Sentinel-2) flies over weekly, so you can try checking back in a few days, or try searching another area.
1B. Download the points by clicking the ‘Download points link’. A pop-up will ask you where to save.
2. Import points into Gaia
Visit the Gaia GPS website. If this is your first time, click ‘Sign Up For Free’, and use the same email you used for the liability waiver/sign up. Note: it may take a few days after you sign up for us to activate your Gaia Premium subscription.
2A Upload points. Once you’ve logged into the Gaia GPS website, on the left menu click ‘Import Data’, then ‘Select Files’, then navigate to where you saved the points.
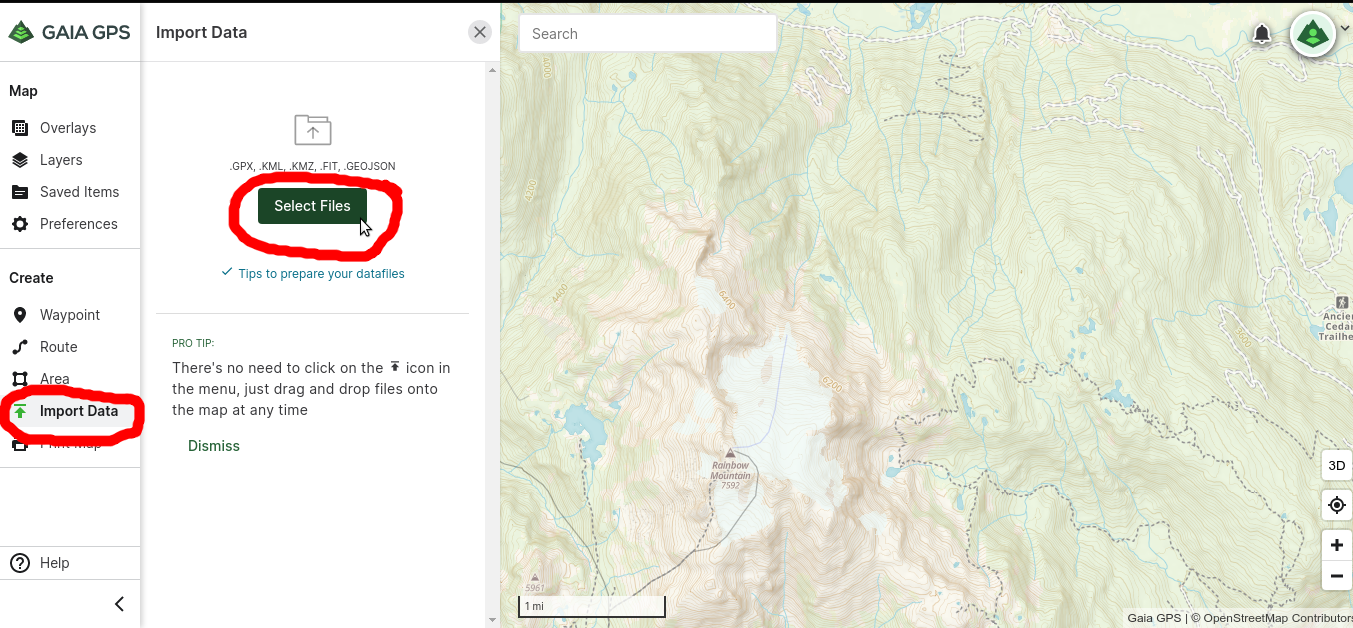
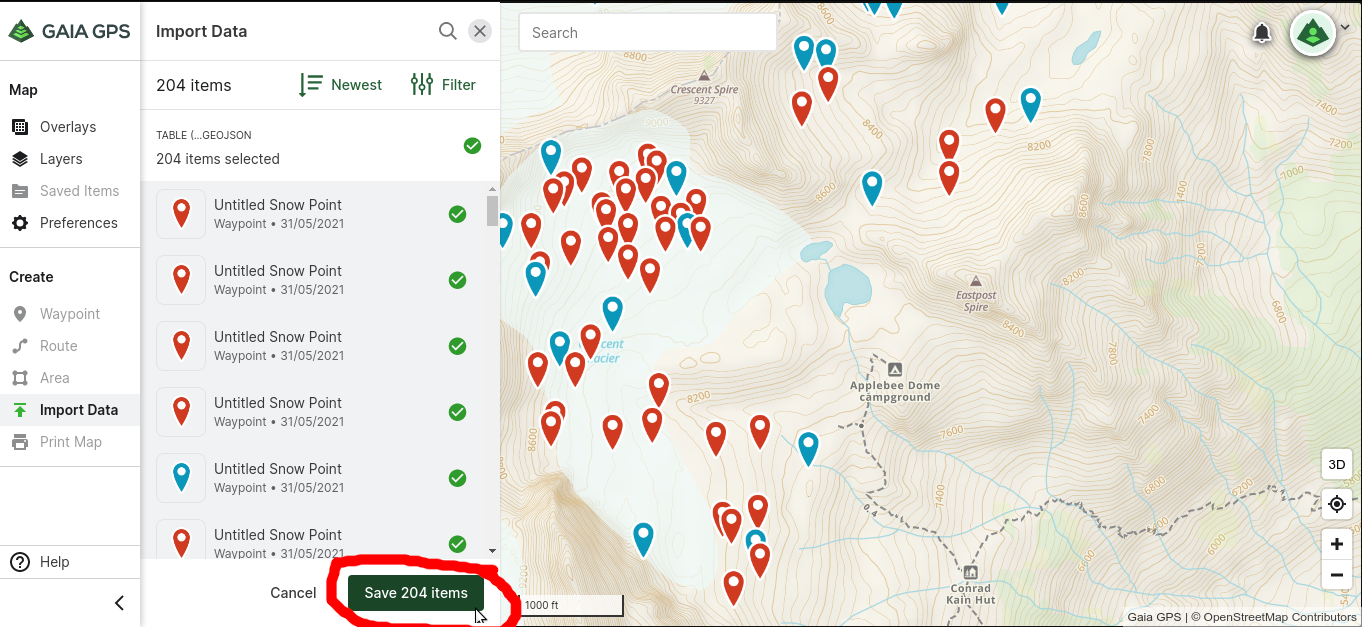
2B Save points. The points will pop up on the map. Click the green ‘Save __ items’ button to upload the points to Gaia Cloud. (Note: you may get a ‘Large file import’ warning message if your file contains many points—if so, check the box and click Import).
2C Sync points to phone. If this is your first time, download Gaia GPS from your smartphone app store, and log in using the same credentials you used for the Gaia GPS website. On your phone, open Gaia GPS and check the map to make sure your points show up on the map.
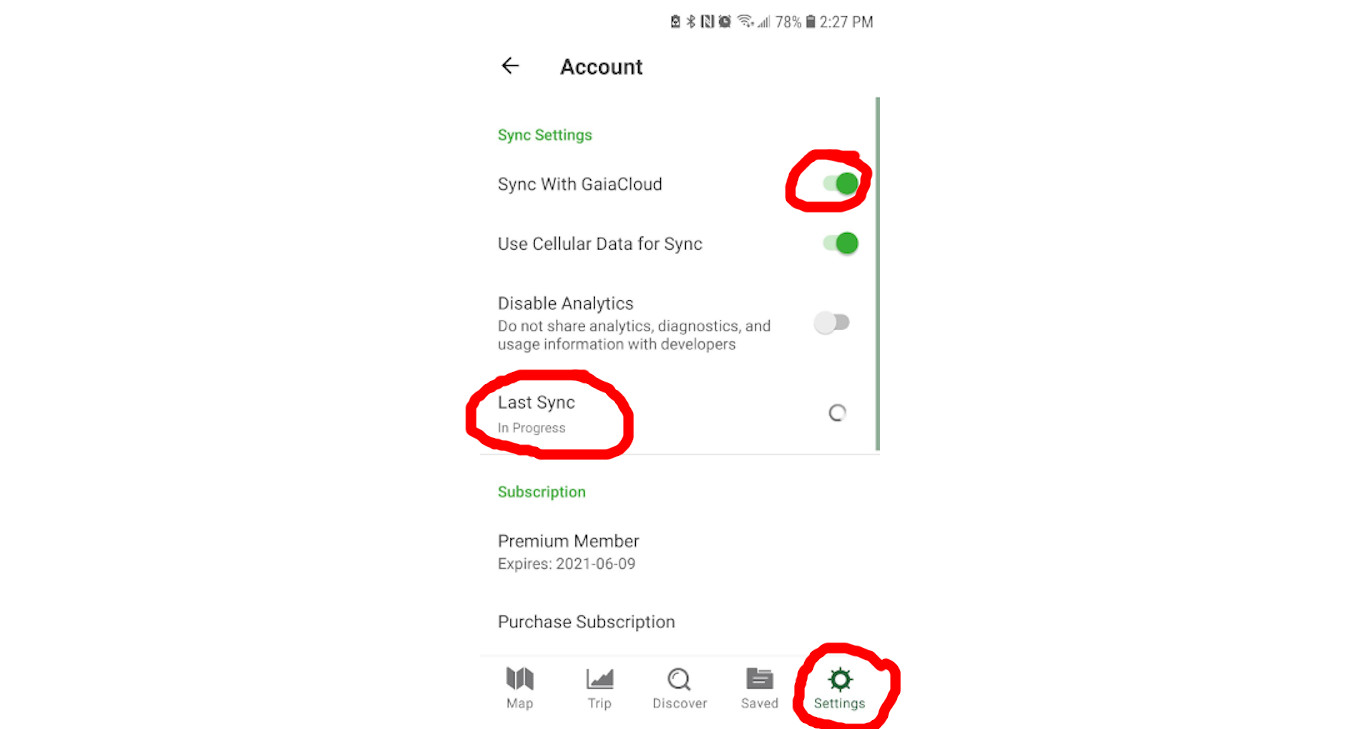
If the points don’t appear, check that your sync settings: in the bottom ‘Settings’ menu, click ‘Account’, make sure the slider for Sync With GaiaCloud is green. Click the grey box where it says ‘Last Sync’ to force a sync now.
3. Collect field data
Please save or download this page onto your phone for reference in the field.
Download the EpiCollect5 app onto your phone, and login with Google. Click ‘Add Project’ in the top right, and search for ‘Snow Algae Atlas’. Note: it may take a few days for us to activate your EpiCollect5 account, please contact us if you have any issues.
In the field, navigate to points using Gaia GPS. Do not visit a point if it feels unsafe for any reason! If possible, try and visit an equal number or red and blue points, but in many cases this will not be possible. Overall we expect there will be more red points than blue, so if in doubt try and visit more red points.
Upon arrival to a point, open EpiCollect5, open the Snow Algae Atlas project, and click ‘Add entry’. The app will guide you through the data collection process.
3A Update location by clicking the button, your coordinates should pop up below, along with the accuracy of your location in metres. Sometimes clicking multiple times will increase the accuracy.
3B Take photos of the snow surface in each of the cardinal directions. Take photos in each direction that shows the snow surface within ~5 metres (~15 feet) of where you are standing. It dosen’t have to be exactly North/East/South/West, just aim in the general direction. Take each photo so that bottom of the frame is just above your boots.
3C Classify the snow surface. Classify the dominant show surface condition within a ~5 m (~15 ft) radius of where you are standing. Choose one of the following:
- Snow algae
- Dirt/debris
- Ash
- White snow
- Mix of algae/dirt
- Forest/vegetation
- Other (please describe in field notes)
Don’t worry if you’re not sure if it’s ash or dirt—just choose “Other” if that’s the case. The important thing is whether or not it’s predominantly pink snow algae at that point, or something else. If there is forest canopy overhead, please choose ‘Forest/vegetation’, even if the snow surface has algae or dirt—the satellite is probably picking up on the trees, not what’s below them.
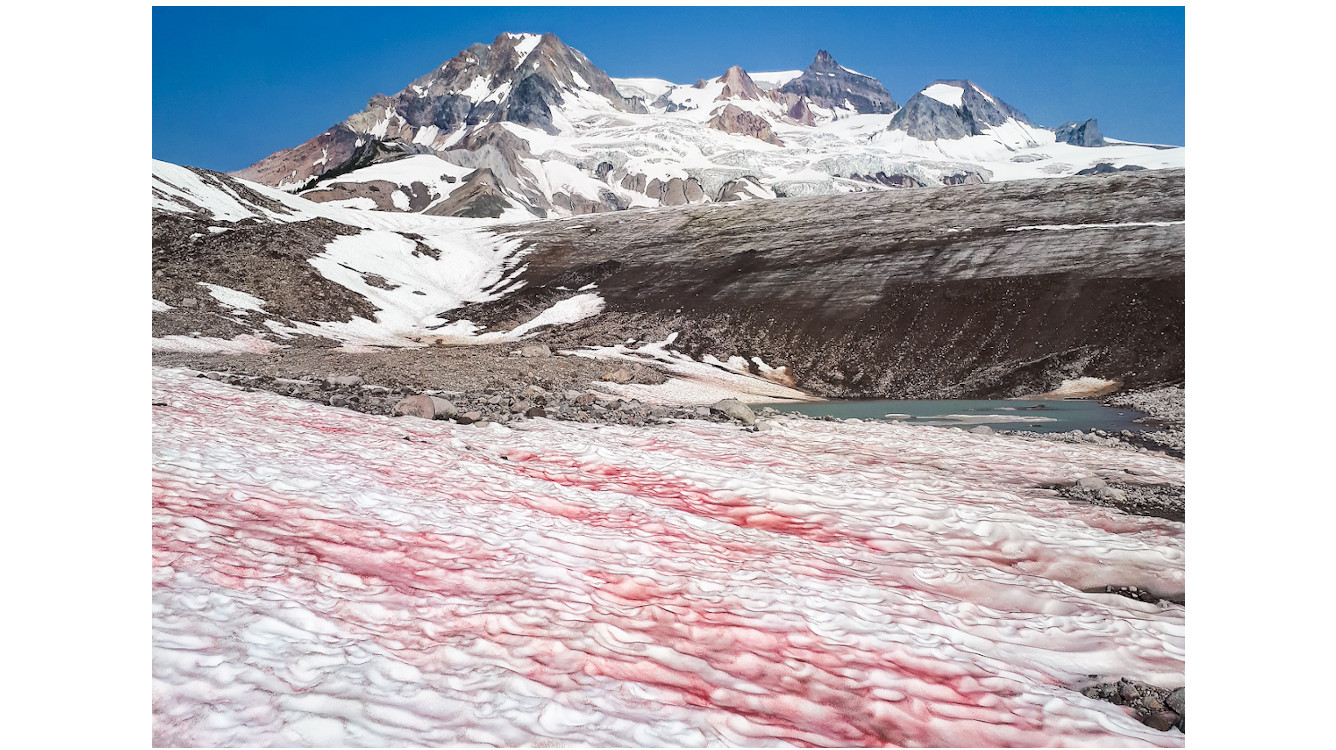
That’s definitely snow algae.
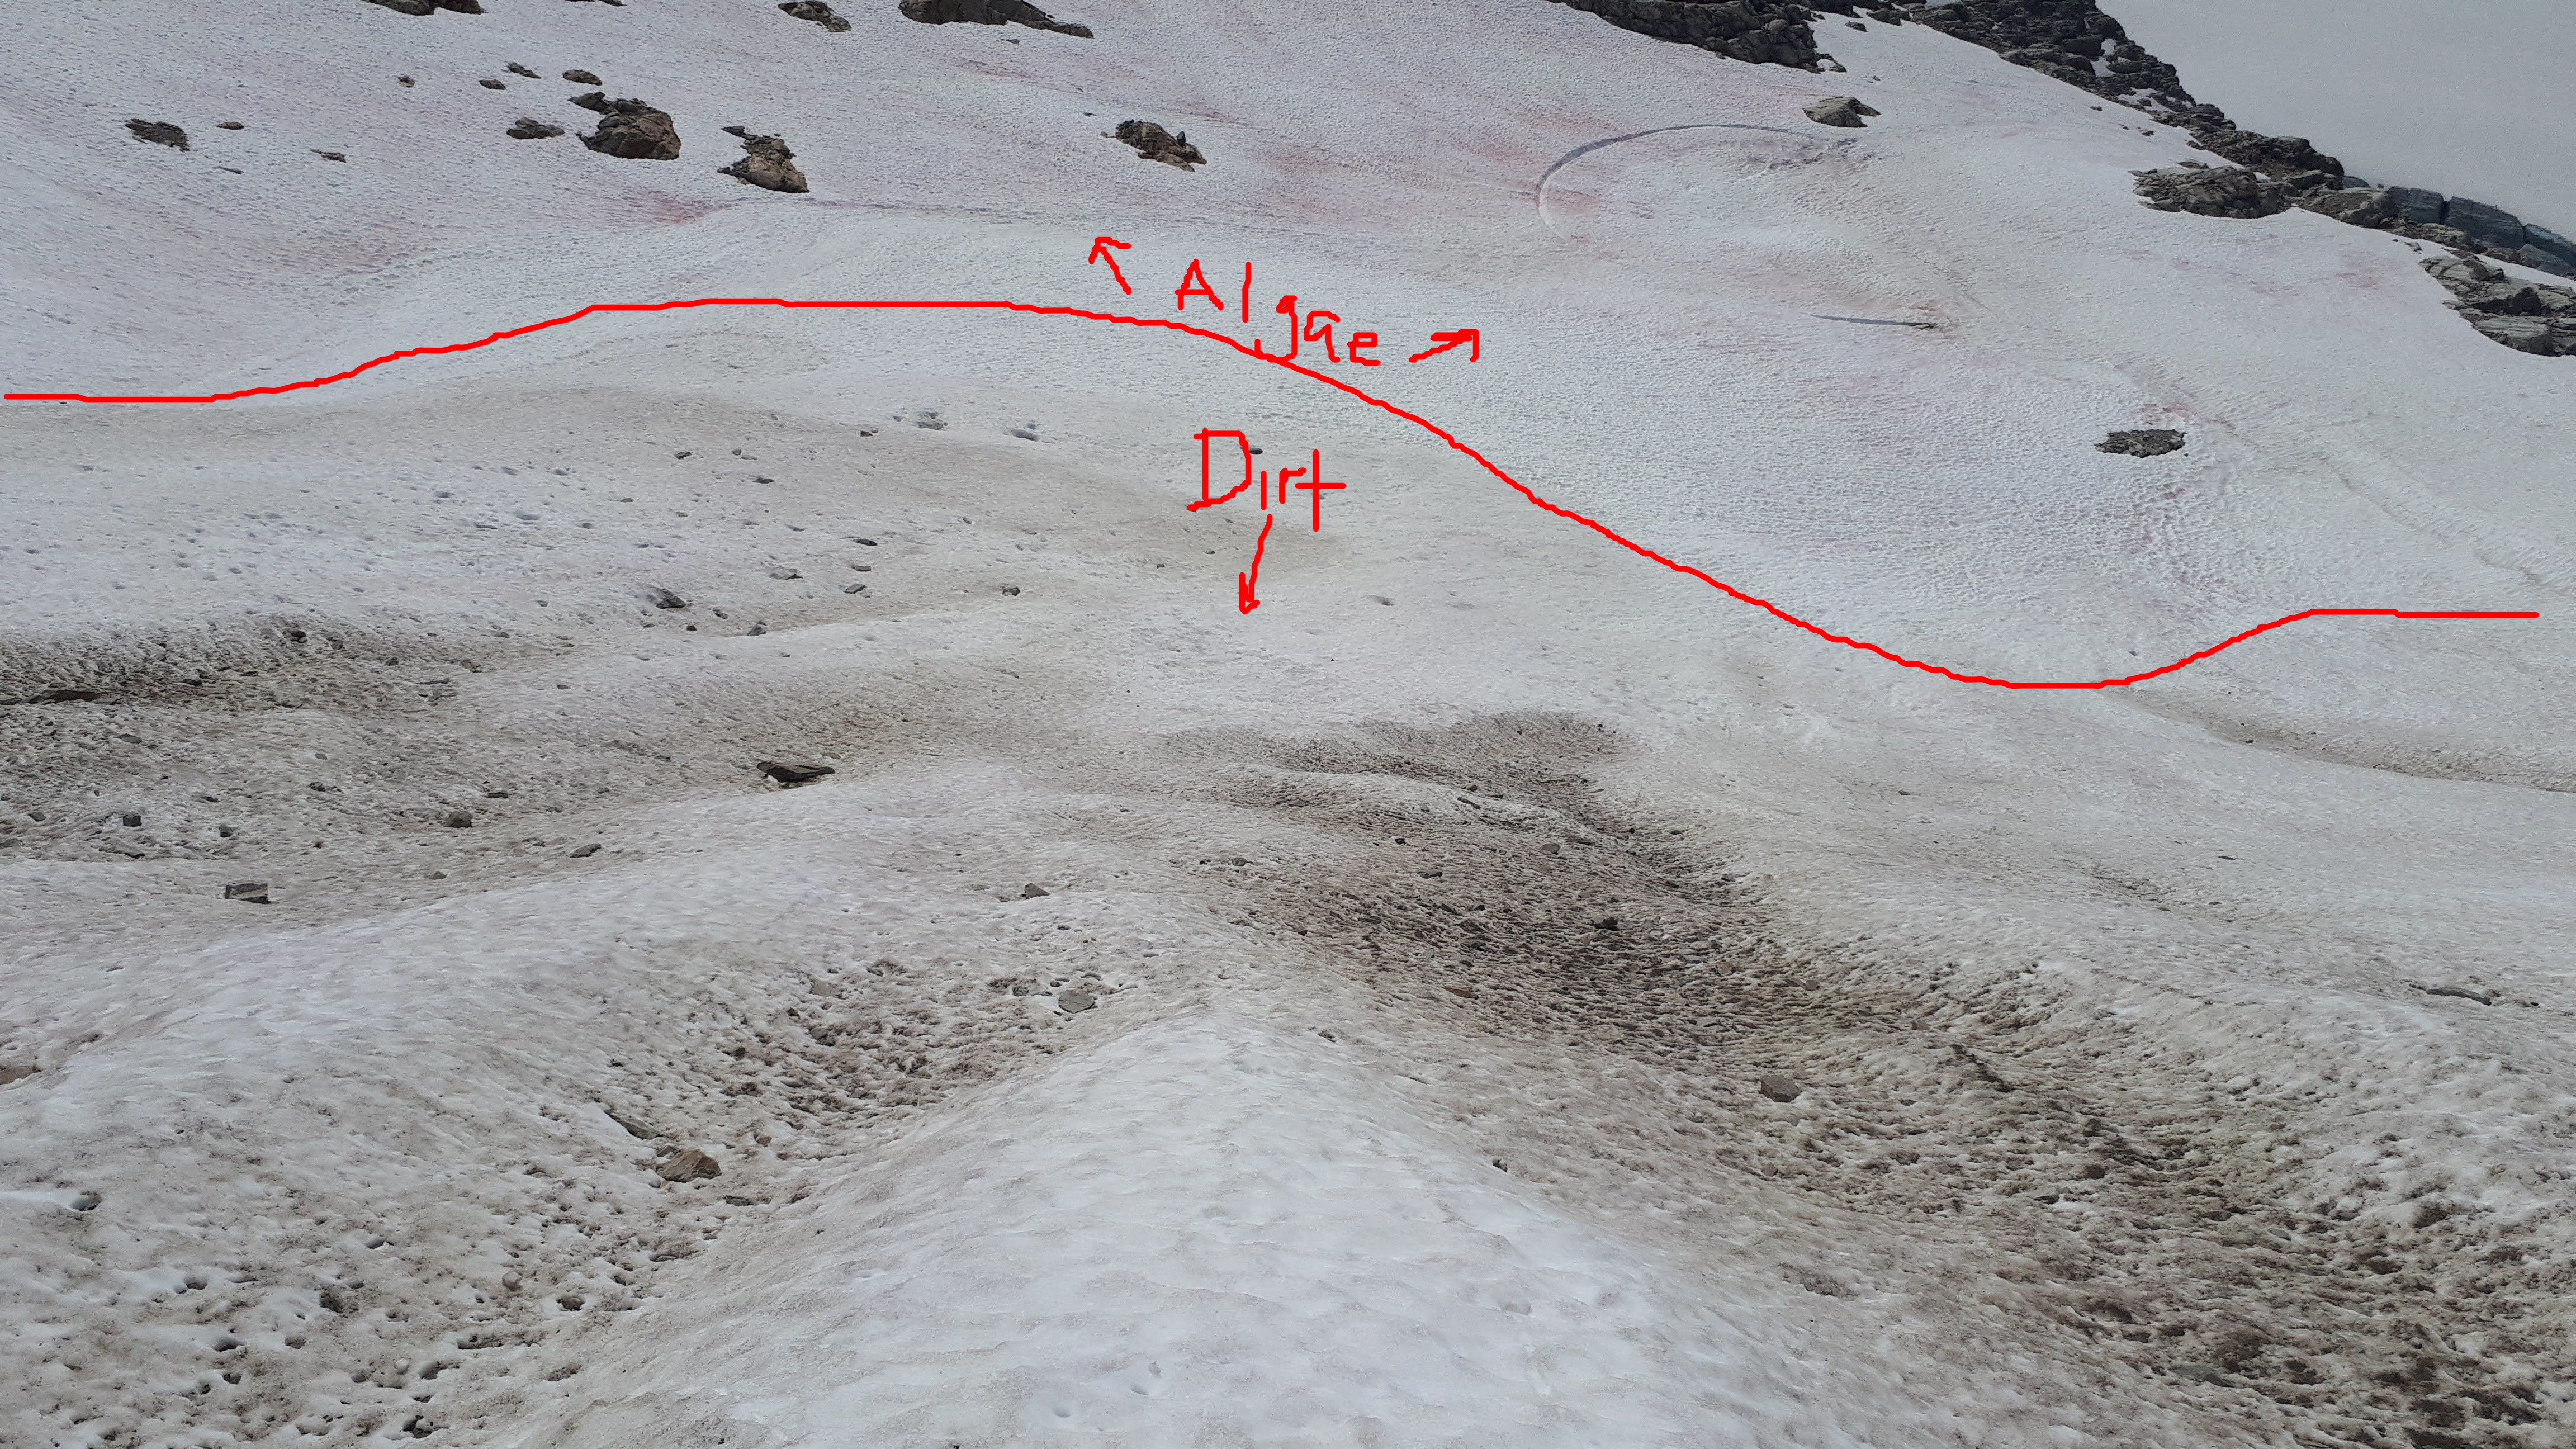
That’s Dirt. Although you can see some pink algae in the background–but that’s outside of the 5 m radius, so I would classify this point as Dirt.
3D Optional fields, and save. If you have any comments on the snow cover classification, please enter in the field notes. If you are doing microscopy, there is a prompt to enter you microscopy photos, and if you are collecting samples for the Living Snow Project enter the sample tube #. You can skip these by hitting next, and finalize your point by clicking ‘Save entry’ button.
Repeat steps 3A - 3D to visit as many points as reasonably and safely possible. Be aware of mountain hazards, and practice Leave No Trace. Remember, we don’t expect you to visit all points, likely many points will not be accessible! Even just one point provides us with valuable data, and between 10 and 20 is reasonable for a day trip. Overall, try and visit an equal number of red and blue points.
4. Sync data
Upon return, open EpiCollect5 on your phone, and click the orange ‘Upload now’ button to submit your data. You can explore your data, view maps, and more on the EpiCollect5 website.
5. Microscopy (optional)
Foldscope offers microscopes for as cheap as $10. They attach to your phone with a magnet so you can take photos and videos. You can do this in the field, just dab a tiny bit of pink snow onto the slide with your finger, put on the cover slip, and hold it up to the light. Or, you can collect some samples in plastic baggies and examine them at home. (If you do this, label the sample bag with a sharpie with the date and time, so you know which entry to add the microscopy photos to). If you take microscopy photos please enter them on the EpiCollect5 app! There are likely many unknown species of snow algae still waiting to be named, and this could provide valuable information on the species distribution. Tag on social media #SnowAlgaeAtlas.
6. Sample collection (optional)
Our colleagues at Western Washington University are collecting samples for DNA sequencing as part of the Living Snow Project. Snow Algae Atlas volunteers are highly encouraged to participate in both projects! Please visit their website for further instructions.